
Your WordPress site is growing, traffic is increasing, and with it the number of users, and you realize that you need a more stable hosting solution. Is your site moving to a new host? Don’t worry, it’s not as hard as you think. Whether it’s that your current host is bogging you down or you just want access to more resources, moving to a new provider can help your site get the boost it needs.
In this tutorial, we will show you easy and quickest ways to migrate your WordPress site to a new host without any hassle. When done the right way and using the right tools, you can switch seamlessly, ensuring that you don’t lose any data and that your site’s function is not disrupted.
Ready to make the switch? So let’s roll up our sleeves and see how you can migrate a WordPress site to a new host without a hitch.
Once your WordPress site starts to become too big for its current hosting home, it may be time to migrate to a new host. This is why it is often a good idea to move this all to a new location, to speed up your website and boost performance and overall user experience. But when, exactly, should you switch?
Here are some key reasons to be aware of:
|
Making the right move at the right time can ensure your site continues to thrive without interruptions.
Migrating your WordPress site might sound daunting, but it doesn’t have to be. With the right tools and methods, you can easily move your site to a new host with minimal hassle.
In this section, we’ll walk you through a simple and effective method for migrating your WordPress site, each tailored to different needs and levels of expertise. Whether you’re a beginner or experienced user, there’s a method that will work best for you. Let’s dive into the options!
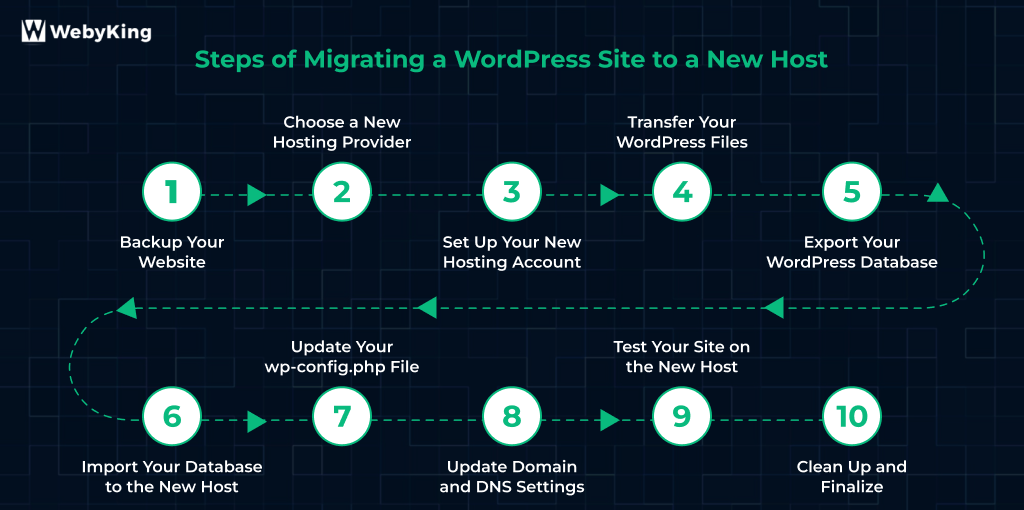
Before you start migrating your WordPress site to a new host, there are a few essential steps you need to take to ensure a smooth transition. Proper transition can save you time, minimize downtime, and prevent data loss.
By following these steps, you’ll ensure that your site migration goes off without a hitch, and your visitors won’t even notice the change.
Why?This step prevents any data loss, whether it’s your posts, pages, media files or settings.
How?You can do this manually or with a plugin.
Ensure that both your website files and the WordPress databases are backed up. Store the backup somewhere safe.
Selecting the best hosting provider is an essential part of your migration process. A reputable host will provide solid performance, security, customer support, and scalability for your growing site.
Why? Choosing a performance optimized provider gives your website great load speed and security.
How? Here are some things to consider when choosing a host:
For instance, Bluehost, SiteGround, Kinsta and WP Engine are popular options. Select the one that is suitable to your budget and requirement.
Once you have chosen your new host, you’ll need to sign up for a plan and set up your hosting environment.
Why? This is the foundation where you’ll migrate all your files and databases.
How?
This step involves moving your website’s core files from the old host to the new host. This includes your WordPress core files, themes, plugins, media files, and any custom code you’ve added.
Why? If you skip this step, your website won’t have its themes, plugins, and images once migrated to the new host.
How?
Using FTP:
Using a Plugin:
Your database contains all of your content: posts, pages, comments, and settings. Transferring this information to your new host is critical for keeping your site’s content intact.
Now that you have the database file, it’s time to upload it to your new hosting provider.
Without this step, your new host won’t have any of your WordPress data like posts, pages, and settings.
The wp-config.php file holds your WordPress configuration settings, including database credentials. After moving your database to the new host, this file needs to be updated with the new database details.
define(‘DB_NAME’, ‘old_database_name’);
define(‘DB_USER’, ‘old_database_user’);
define(‘DB_PASSWORD’, ‘old_database_password’);
define(‘DB_HOST’, ‘localhost’);
2. Replace ‘old_database_name’, ‘old_database_user’, and ‘old_database_password’ with the new details (database name, username, password) you created earlier.
3. Save the changes.
After your site and database are transferred, you’ll need to point your domain to the new hosting server by updating your DNS settings.
After completing the migration, thoroughly test your site to make sure everything is functioning properly.
After confirming everything is working on the new host, it’s time to tidy up.
By following these detailed steps, you’ll successfully migrate your WordPress site to a new host with minimal hassle. With careful planning and execution, your site will be up and running on the new host in no time—just like a pro!
Using a plugin to migrate your WordPress site is easily one of the simplest and most effective methods. Today there are plenty of effective plugins such as All-in-One WP migration, Duplicator, UpdraftPlus, which can help streamline the migration process.
These plugins make the entire process easier — wrapping your site’s files and databases into a downloadable file so that you can move it over to the new host with ease.
Just install them on your existing WordPress site, follow the procedures, and let the plugin do the rest. After this migration, you only upload the backup to your new host and restore your site in a few clicks.
This method minimizes downtime and reduces the risk of errors, making it ideal for beginners or anyone looking for a hassle-free migration process.
We’ve gone through some of the different steps for migrating your site to show you that a thoughtful approach combined with the right tools can save a ton of time and effort. But why stress over the complexities when WebyKing is here to make your migration process effortless?
We guarantee a seamless, secure, and trouble-free migration for your website—big or small—with our skilled crew and high-quality services.
At WebyKing, we offer the best website migration services tailored to your specific needs. From seamless data transfer to ensuring your site’s performance remains top-notch, we’ve got you covered every step of the way. Let us handle the technicalities, while you focus on what matters most—growing your business!
There may be a brief downtime while DNS changes propagate, but with proper planning, the migration can be completed with minimal disruption.
Yes, your theme will work on the new host as long as it’s compatible with your WordPress version and all necessary files are transferred correctly.
The migration process typically takes anywhere from a few hours to a day, depending on the size of your site and the method used.
While some methods require technical knowledge, using plugins or professional services like WebyKing makes it easy and accessible for beginners.
Yes, as long as you back up your site properly and follow the correct migration steps, all your content should transfer securely without any loss.
Ravi Makhija, the visionary Founder and CEO of WebyKing, is a seasoned digital marketing strategist and web technology expert with over a decade of experience. Under his leadership, WebyKing has evolved into a premier full service web and marketing agency, delivering innovative solutions that drive online success. Ravi’s deep understanding of the digital landscape combined with his passion for cutting-edge technologies empowers him to consistently exceed client expectations and deliver results that matter.

Let’s turn your ideas into impact—reach out and let’s build something exceptional together.
Customer
Retention Ratio
Certified Professionals
Projects
Years of Experience


TRUSTED BY 100+ CLIENTS, WITH OVER 100 PROJECTS SUCCESSFULLY DELIVERED AS A FULL-SERVICE WEB AGENCY
TRUSTED BY 100+ CLIENTS, WITH OVER 100 PROJECTS SUCCESSFULLY DELIVERED AS A FULL-SERVICE WEB AGENCY
TRUSTED BY 100+ CLIENTS, WITH OVER 100 PROJECTS SUCCESSFULLY DELIVERED AS A FULL-SERVICE WEB AGENCY
Web Design By Industry
Digital Marketing
eCommerce Web Design
SEO Services
Lead Gen By Industry
Migration By Platform
PPC By Industry
Maintenance By Platform
Our Presence
Expand your business digitally on a global scale! We’re always ready at your service, with dedicated teams in three key international locations.
5354 Denny Ave, North Hollywood, Los Angeles, CA 91601, United States.
9720 Jones Rd, S210, Houston, TX 77065, United States.
The Spire, Office No: 312, Near Ayodhya Chowk BRTS Bus Stop, 150 Feet Ring Road, Rajkot
Share your details below and we’ll get back to you soon.
We’ll get back to you shortly.


