The Essential Steps for a Smooth WordPress to Squarespace Migration
")
Updated on: February 5, 2026
Reading Time: 8 minutes
Post Views: 128
Moving your website from WordPress to Squarespace doesn’t have to be overwhelming. With cleaner templates and built-in features, Squarespace can simplify your workflow but only if the migration is done correctly.
This guide will show you how to safely transfer your content, protect your SEO during migration, and rebuild your site on a platform that’s easier to maintain. By the end, you’ll have a clear roadmap for making the transition smoothly.
Important Note:
As you migrate from WordPress to Squarespace, prioritise your top-performing content to retain engagement. Choose a Squarespace template that enhances user experience, and don’t forget to implement proper SEO strategies to maintain your traffic.
Why Should You Consider Moving From WordPress to Squarespace?
When WordPress Starts Feeling Heavy
- Managing plugins, updates, and security checks becomes time-consuming
- Fixing technical issues takes attention away from your actual content
- Customizing the design requires themes, builders, or developer help
- The platform feels overwhelming if you’re not tech-savvy
Squarespace Makes Your Life Simpler
- Everything is built-in — no plugins, no maintenance, no conflicts
- Drag-and-drop editor makes editing pages effortless
- Templates look modern and clean right out of the box
- SEO, design tools, forms, and analytics are all included
- You spend time building your brand, not fixing your website
Why Thousands of Users are Switching from WordPress to Squarespace
- They want a site that looks professional with less setup
- They’re tired of handling WordPress updates and errors
- They prefer a platform where design changes take seconds, not hours
- They want consistency — fewer moving parts, fewer surprises
- They want a smoother, more visual editing experience
In Simple Terms
- WordPress is powerful but it demands maintenance.
- Squarespace is simple and helps you stay focused on your business.
The table below highlights the core strengths of each platform to give you a clearer overview.
| Feature/Aspect | WordPress | Squarespace | |||||
|---|---|---|---|---|---|---|---|
| Customisation |
|
|
|||||
| Ease of Use |
|
|
|||||
|
|
|
|||||
|
|
|
|||||
| eCommerce |
|
|
|||||
|
|
|
|||||
| Content management |
|
|
|||||
|
|
|
For a complete comparison of features, flexibility, and ease of use, read our guide on WordPress vs Squarespace.
How to Migrate from WordPress to Squarespace?
Since you’re ready to switch from WordPress to Squarespace, it’s important to follow the right steps to avoid losing data or disrupting your site’s performance. The good news? Squarespace makes the migration relatively simple.
Let’s walk through the entire WordPress to Squarespace migration process so you can rebuild your site confidently.
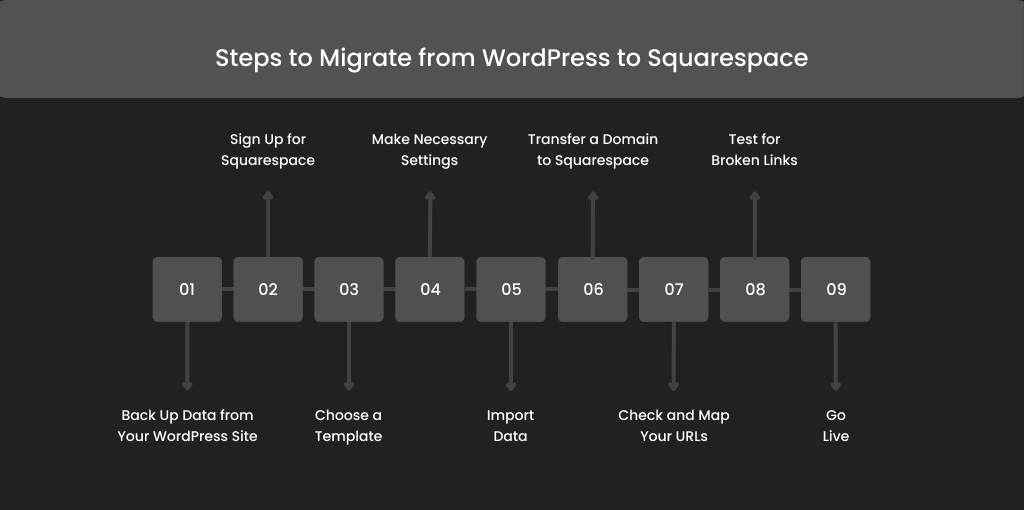
Step 1: Back Up Data from Your WordPress Site
First, start by ensuring all critical data is backed up securely in a separate environment. In case of issues during the migration process, you can return to the store’s original state.
To back up your WordPress content, you can manually download it as a CSV file to move to critical data (such as products, customer details, content, etc. ). Valuable data from WordPress backup includes:
Customer data
- Customer data
- Content
- Product or service information
- Blog posts
- Analytics data
Step 2: Sign Up for Squarespace
Before you start the migration process, you must create an account on Squarespace. Visit the Squarespace official website and choose the pricing plans that match your requirements. It offers several pricing plans, including:
- Personal Plan: Best for individuals or small projects, comes with basic functionalities and design preferences. (Starts from $16/ month).
- Business Plan: Ideal for small businesses, offering premium marketing tools and eCommerce capabilities. (Starts from $23/ month).
- Basic Commerce Plan: Designed especially for eCommerce entrepreneurs, this plan comes with advanced features such as inventory management and customer accounts. (Starts from $28/ month).
- Advanced Commerce Plan: This plan has several features, such as shipping options and intelligent analytics, for more critical eCommerce operations. (Starts from $52/ month).
Choose the best plan based on your requirements and complete the registration process. Moreover, the platform also offers a 14-day free trial; if you are not sure about the platform’s capabilities, you can get started with the free plan.
Step 3: Choose a Template
Once you’ve registered, it’s time to bring your vision to life by selecting a template for your new website! Squarespace offers a fantastic variety of templates tailored for different businesses—think of it as choosing the canvas for your masterpiece.
Take your time to explore both the free and premium options. As you browse, consider how each design and color scheme aligns with your brand’s personality. Do you want something sleek, modern, or a more artistic and vibrant look?
When you find a template that resonates with you, think of it as the foundation of your site. Starting with a design that matches your needs will save you time in the long run, allowing you to focus more on showcasing your work rather than reworking the layout.
So, dive into the templates and find the one that feels right for you!
Step 4: Make Necessary Settings
Once you have your template, click into your Squarespace dashboard and go to the Settings section. Here are a few settings you should set up to get your site live:
- Site Title and Logo: Update your site title and upload a logo.
- Favicon: Upload a favicon so your website can be even more recognizable.
- Social Links: Connect your social media accounts so that you can also integrate sharing options.
- SEO Settings: Add meta titles and descriptions for your home page to optimize it for search engines.
Plan all these options, and your site will be ready to go when your visitors come.
Step 5: Import Data
It is time to import your WordPress content into Squarespace. The good news is that Squarespace offers an easy and seamless method of importing data from WordPress. Here is how:
- Head to Settings > Advanced > Import/Export from your Squarespace dashboard.
- Click on the Import option and then click on WordPress.
- Enter your WordPress site’s URL and follow the instructions to authenticate the connection.
Squarespace can import posts, pages, and simple media, but the formatting and some items, such as custom fields, may not carry over well, so be prepared for manual tweaking.
Step 6: Transfer a Domain to Squarespace
If you have a custom domain, you’ll want to transfer it to Squarespace to ensure an easy transfer. Here is how:
- In Squarespace, go to Settings > Domains.
- Click Connect a Domain.
- For a domain registered somewhere else, follow the instructions for transferring or connecting a domain.
Unlock your domain at your current registrar and get the authorisation code for the transfer. It is crucial if you do not want any downtime and maintain your online presence.
Follow Squarespace’s instructions, which are very helpful and straightforward, as these procedures vary based on where your domain is now hosted. If you intend to launch on a specific day, remember that your domain may take up to 48 hours to connect.
If you encounter trouble with this step, opt for professional migration experts or contact Squarespace customer service for assistance.
Step 7: Check and Map Your URLs
After importing your content and connecting a domain, you must check and map your URLs to maintain SEO and user experience. Here’s what you can do:
- Review your existing WordPress URLs and compare them with the imported content on Squarespace.
- Implement 301 redirects for Old URLs in the new Squarespace. To perform this, go to the settings> SEO> URL mapping.
- Make sure you have a record of the redirects so that users and search engines are directed to the correct pages.
This step reduces broken link incidences and helps maintain your search engine ranking.
Step 8: Test for Broken Links
Once every setup is in place, the last procedure is a lengthy test to ascertain whether there are any broken links present in the system:
- Implement any tools provided, such as Broke Link Checker or Screaming Frog SEO Spider, to examine your new Squarespace site.
- Look through the given data and correct any links cited in the text that do not work by changing the address or issuing a redirect.
In addition to ensuring that everything on the website is fully functional, testing for broken links also sustains the website’s integrity by eliminating possible causes for a negative perception of it.
Step 9: Go Live
Finally, once you follow the above migration steps, it’s high time you go live. Here are some tips that will prove fruitful after your successful WordPress to Squarespace migration:
- Send out Promotional Mail to Your Customers: If you have an email from past customers, send them notification mail about the migration. Tell them it won’t impact the user experience and add more modern features to make the experience memorable.
- Shoutout on Social Media: All the links you posted on social media are for your old WordPress site. White redirects will ensure people will always visit the new Squarespace website. Giving all the links you share on social media is best to stay consistent.
Pro Tip: Plan Your Content Strategy!
Before you migrate, take a moment to outline your content strategy. Think about what pages, posts, and images are essential for your new Squarespace site. Prioritise high-performing content and ensure it aligns with your brand’s goals.
Bonus: Create a checklist of content to keep track of what to migrate, update, or discard. This way, you’ll have a smooth transition and can focus on what truly matters—showcasing your work!
10 Things to Do After Transferring Your WordPress Website to Squarespace
Make sure everything works smoothly after your WordPress to Squarespace migration with this quick post-migration checklist:
- Review every page and blog post to confirm the layout, formatting, and content transferred correctly.
- Scan all images to ensure they display properly and maintain good resolution.
- Test internal and external links so users don’t land on broken or outdated pages.
- Submit all contact and newsletter forms to confirm they’re capturing and sending data accurately.
- Verify that any connected tools or extensions are installed and functioning as expected.
- Check your navigation menus to make sure the structure is correct and links point to the right places.
- Update Squarespace SEO settings, including titles, descriptions, slugs, and redirects.
- If you’re selling products, review your store settings, checkout process, and product details.
- Confirm SSL is active and all security settings are properly configured.
- Ensure analytics, tracking codes, and integrations like Google Analytics or Search Console are recording data.
Let WebyKing Handle Your WordPress to Squarespace Migration Process
Now that you know how to migrate from WordPress to Squarespace, it’s time to take action! We understand this decision is crucial for your business, and the migration process can come with risks and challenges.
That’s where we come in! At WebyKing, we’re not just another website migration service provider—we’ve successfully migrated over 150 websites, ensuring smooth transitions without downtime or disruptions.
Don’t let migration worries hold you back! Reach out to us today and discover how we can simplify the process. Your website’s success is just a step away, and with our expertise in the latest technical trends, we’ll execute a flawless migration tailored to your needs.
Let’s get started on your journey to a better website together!
FAQs on Switching from WordPress to Squarespace
Will migrating from WordPress to Squarespace affect my SEO?
Yes, it can affect SEO. To minimize impact, set up 301 redirects, maintain content quality, optimize page titles, and monitor your site’s performance after migration.
Is Squarespace easier to use than WordPress?
Yes—Squarespace is generally easier to use than WordPress because it offers a simple drag-and-drop editor with built-in features that don’t require plugins or technical setup.
What is the downside of Squarespace and how can I encounter it?
Squarespace’s main downside is limited customization compared to WordPress, but you can overcome this by using custom CSS, choosing a flexible template, and leveraging built-in design tools effectively.
Can I import my WordPress blog posts, pages, and images into Squarespace automatically?
Yes, Squarespace’s import tool allows you to transfer posts, pages, and basic content automatically, but some formatting and media may need manual adjustments.
Will my WordPress plugins and custom features work after moving to Squarespace?
No, plugins don’t transfer. You’ll need to recreate features with Squarespace’s built-in tools or alternatives available in their extensions marketplace.
Can I keep my existing WordPress domain when switching to Squarespace?
Absolutely. You can connect or transfer your domain to Squarespace without losing ownership.
How long does a typical WordPress to Squarespace migration take?
Most basic sites take a few hours to a day. Larger sites with multiple customizations may take a few days for manual adjustments.
Do I need to manually recreate my WordPress design in Squarespace?
Yes. Design and layout do not migrate. You need to choose a Squarespace template and rebuild the design visually.
What happens to my WordPress hosting after I switch to Squarespace?
Once your site is fully migrated and your domain points to Squarespace, you can cancel your WordPress hosting to avoid extra charges.
Do I need technical expertise to move from WordPress to Squarespace?
Basic users can handle migration with Squarespace’s import tool, but complex sites may require a developer for clean formatting and SEO setup.
Can I still access my WordPress site after moving to Squarespace?
Yes, until you cancel hosting — many users keep their WordPress site temporarily as a backup during the transition.
Does Squarespace support eCommerce features after migration?
Yes. You can set up products, checkout, inventory, and payments directly in Squarespace, but product data must be manually recreated if you were using WooCommerce.
Ravi Makhija, the visionary Founder and CEO of WebyKing, is a seasoned digital marketing strategist and web technology expert with over a decade of experience. Under his leadership, WebyKing has evolved into a premier full service web and marketing agency, delivering innovative solutions that drive online success. Ravi’s deep understanding of the digital landscape combined with his passion for cutting-edge technologies empowers him to consistently exceed client expectations and deliver results that matter.