
Last Updated: October 5, 2026
[rt_reading_time label="Reading Time:" postfix="minutes" postfix_singular="minute"]
Post Views: 166
- Should You Migrate from Wix to Shopify?
- What Actually Migrates from Wix to Shopify
- Which Wix to Shopify Migration Method Is Right for You?
- Step-by-Step Wix to Shopify Migration Process
- Will You Lose Google Rankings When You Move from Wix to Shopify?
- How Much Does It Cost to Migrate from Wix to Shopify?
- How Long Does a Wix to Shopify Migration Take?
- Post-Migration Checklist
- Final Thoughts
- Frequently Asked Questions
If you’re planning to migrate from Wix to Shopify, the good news is your store does not need to go offline during the process. You can build and test your Shopify store in the background, migrate your data, set up redirects, and only switch your domain when everything is ready.
This Wix to Shopify migration guide walks you through the complete migration process: what data moves, what doesn’t, the exact Wix to Shopify migration steps, SEO protection, and a post-migration checklist.
Should You Migrate from Wix to Shopify?
Wix is a good place to start selling. Most store owners move when the store grows past what Wix was built for.
You should consider migrating if:
- You hit the Wix product variant limits
- You need advanced ecommerce functionality
- You want multichannel selling
- You need better SEO flexibility
- You plan to scale your store
You may stay on Wix if:
- You sell only a few products
- Your store is simple
- You don’t need advanced ecommerce features
- You don’t plan to scale
What Actually Migrates from Wix to Shopify
When you migrate from Wix to Shopify, you’re not just copying files from one folder to another. Wix and Shopify are entirely different platforms with distinct architectures, URL structures, and data formats. Understanding what transfers cleanly, what needs manual handling, and what cannot transfer at all prevents the surprises that catch most people off guard.
What can be migrated
| Data | Migrates? | Notes |
|---|---|---|
| Products (titles, descriptions, images, prices, SKUs) | Yes | By CSV or a migration app |
| Product variants (size, color and so on) | Yes | Shopify allows 3 options and up to 2,048 variants per product. Products with more than 3 options need restructuring |
| Product categories | Yes | Rebuilt as Shopify collections |
| Inventory levels | Yes | Check the numbers after import |
| Customer records (name, email, address) | Yes | Passwords do not transfer |
| Order history | Partly | Needs a migration app or an order import tool |
| Coupons and discount codes | Partly | Usually recreated in Shopify |
| Product reviews | Partly | Imported through a Shopify review app |
| SEO meta titles and descriptions | Partly | Some apps move them. Check every important page |
| Blog posts | By hand | Wix has no blog export |
| URLs | No | Every URL changes, so each one needs a 301 redirect |
What you have to rebuild
| Item | What to do instead |
|---|---|
| Customer passwords | They can’t be transferred. Send account activation emails after launch |
| Wix theme and design | Choose a Shopify theme and rebuild your storefront |
| Wix apps | Replace each one with a Shopify app |
| Velo custom code | Rebuild the feature with a Shopify app, theme code or a custom app |
| Wix Bookings, Events and Members Area | Replace with Shopify apps |
| Blog posts and pages | Copy them into Shopify’s editor |
| Digital products | Wix doesn’t export the files. Upload them again and set up a digital delivery app |
| Payment, shipping and tax settings | Set them up again in Shopify |
| Custom product fields | Recreate them as Shopify metafields |
| Translated versions of your site | Recreate them with Shopify Markets and the Translate & Adapt app |
Which Wix to Shopify Migration Method Is Right for You?
There are four ways to move. The right one depends on the size of your store, how much Google traffic you need to protect and how much time you have.
| Method | Best for | What it moves | Cost |
|---|---|---|---|
| Shopify Store Migration App | Small stores that only need products and customers | Products and customers | Free |
| Manual CSV | Stores under 100 products that don’t need order history | Products and customers | Free, but it takes your time |
| Migration apps (LitExtension, Cart2Cart) | Stores with 100 to 500 products that also need orders moved | Products, customers, orders and more | Paid. The price depends on how much data you move |
| Professional migration service | Stores with 500+ products, strong SEO traffic or custom features | Everything, including redirects, design and apps | Custom quote |
Third party migration tools
If you want to automate more than CSV import allows, these tools help.
- LitExtension. An automated migration tool with an optional managed service. It moves products, customers and orders, and offers a free demo migration so you can see how your data comes across before you pay.
- Cart2Cart. A cloud based tool. You connect your Wix and Shopify stores and it moves the data for you while both stores stay live. A free demo migration is available.
- Matrixify. A bulk import and export app for Shopify that works with spreadsheets. It’s useful for loading large catalogs, blog posts and redirect lists in one go. It takes more technical skill than the others.
- EZ Importer. A Shopify app that imports historical orders from a CSV file.
One rule for every tool: turn off Shopify’s staff order notifications before you import old orders, and turn them back on afterwards. If you don’t, your team’s inbox fills up with years of order emails.
When to hire a professional
Consider a professional migration if:
- Your store has 500 or more products
- A good share of your sales comes from Google
- You have a blog with posts that rank
- Your store uses Velo code, Bookings, Members Area or other custom features
- You can’t risk losing data or sales
For small, simple stores, doing it yourself is usually enough. For growing or SEO driven stores, an experienced team helps you avoid the common mistakes. You can request a Wix to Shopify migration assessment to see what your move involves.
Step-by-Step Wix to Shopify Migration Process
Follow these ten steps in order to move your Wix store to Shopify without losing data or rankings.
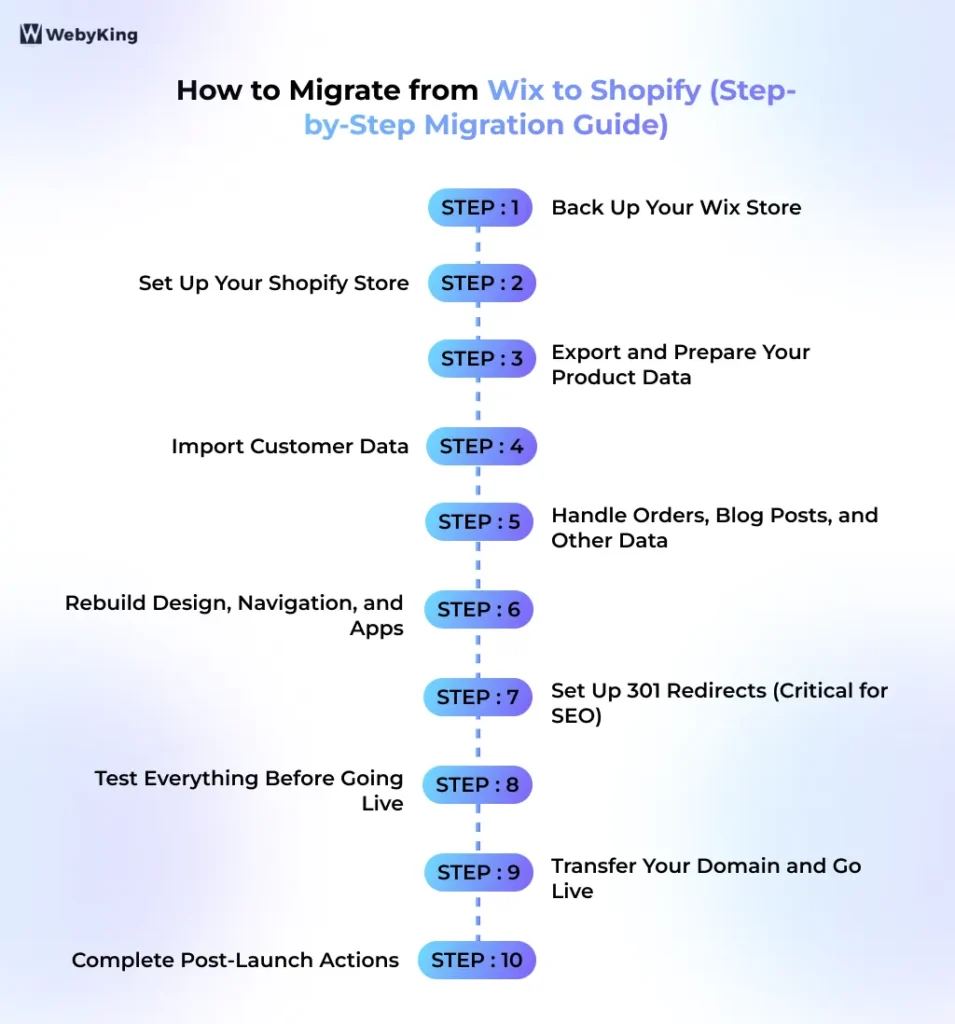
Step 1: Back Up Your Wix Store
Before doing anything, create a complete backup of your Wix store.
Back up your Wix site history
In your Wix Dashboard, go to Site Actions → Site History. Wix automatically saves versions when you publish; you can access and restore any previous version from here. Create a manual save point by publishing a minor change before starting.
Export your products
- In your Wix Dashboard, go to Catalog → Store Products → Products
- Click More Actions → Export
- Select All and click Export
- Name the file WixProductDownload.csv and save it
Export your orders
- Go to Sales → Orders
- Tick the Order checkbox to select all orders
- Click Export, this saves a CSV to your browser
Export your customer contacts
- Go to Customers & Leads → Contacts
- Click Import/Export → Export
- Download the CSV
Important digital products
Wix does not support exporting digital products. If your store sells digital downloads, you’ll need to re-upload each one manually in Shopify after migration.
Important blog posts
Wix has no blog export feature. Every blog post must be manually copied and pasted into Shopify’s blog editor. For stores with substantial blog content, budget time for this; it’s often the most time-consuming part of a Wix migration.
Store all exports in a folder along with screenshots of your current Shopify store settings (shipping rates, tax configurations, payment gateways). These serve as your reference during the rebuild.
Record your SEO baseline
Before the switch, save a list of your most important URLs and record their current organic traffic, rankings, SEO titles, meta descriptions, and important backlinks.
This gives you a clear benchmark for checking the new Shopify site after launch.
Step 2: Set Up Your Shopify Store
Create your Shopify account
Go to Shopify.com and start your free trial. During signup, when asked “Which platform are you moving from?,” Select Wix; Shopify will configure certain defaults accordingly and prompt you to install the Store Migration App.
Do not install WordPress or any starter content. You’re importing an existing store.
Choose your Shopify plan
| Plan | Monthly Price | Price per month, billed yearly | Best For |
|---|---|---|---|
| Basic | $39 | $29 | Solo stores with simple operations |
| Grow | $105 | $79 | Growing stores that need more staff accounts |
| Advanced | $399 | $299 | Scaling stores that need advanced reports |
| Shopify Plus | From $2,300 | N/A | High volume, wholesale and enterprise stores |
Prices as listed on Shopify’s pricing page in October 2026. Most Wix stores start on Basic or Grow.
Choose a Shopify theme
Your Wix design can’t be transferred, so you have three choices:
- Use a Shopify theme. The quickest and cheapest route. Shopify has free themes, and paid themes are a one time purchase from the Shopify Theme Store.
- Recreate your current look. A good choice if your customers know your store and it already sells well.
- Redesign. Worth it if your current store isn’t converting. Our Shopify design team can help.
Whichever you choose, check the theme on a phone first and make sure it suits the size of your catalog.
Set up the basics. Add your currency, tax rules and shipping zones now. None of these come across from Wix.
Step 3: Export and Prepare Your Product Data
You have two paths here: use Shopify’s native Store Migration App (simplest) or prepare a CSV manually (more control).
Option A: Shopify Store Migration App (Easiest)
Shopify’s first-party Store Migration App is currently in early access, available for qualifying stores on desktop. After creating your Shopify account and selecting Wix as your source platform, Shopify will prompt you to install it from your setup guide.
What it does: accepts your Wix product CSV as-is, without requiring you to reformat column headers. Shopify handles the mapping automatically.
What it doesn’t do: handles only products and customers, not orders, blog posts, or redirects.
To use it:
- Install the Store Migration App from your Shopify setup guide
- Upload your WixProductDownload.csv file
- Click Import, the app processes the file and reports what was imported and what had issues
- Review the import report and address any flagged items
Option B: Manual CSV Import
If the Store Migration App isn’t available to you or you want more control, manually reformat your Wix export to match Shopify’s CSV template.
Key column mappings from Wix to Shopify:
| Wix Column | Shopify Column |
|---|---|
| name | Title |
| description | Body (HTML) |
| price | Variant Price |
| discountedPrice | Variant Compare At Price |
| sku | Variant SKU |
| inventory | Variant Inventory Qty |
| weight | Variant Grams |
| productImageUrl | Image Src |
| collection | (map to Collections manually) |
| slug | Handle |
Rules to follow for a Shopify CSV:
- Save the file as CSV UTF-8, not standard CSV
- Give each variant its own row, with all rows of a product sharing the same Handle
- Make sure image URLs are public, so Shopify can fetch them during import
- Use Shopify’s sample CSV as your guide. You’ll find it under Products → Import
To import, go to Products → Import, add your file, untick the option to publish to all sales channels, then upload and preview. Check the variants, prices and images in the preview before you confirm.
If your products have more than 3 options
Wix allows up to 6 options per product and Shopify allows 3. You have three ways to fix this:
- Combine options. Merge two options into one, for example “Color and Material” with choices like “Blue Cotton” and “Blue Linen”.
- Split the product. Turn one large product into two or three smaller ones, such as one per material.
- Move extras out of variants. Options that don’t affect stock or price, like engraving text or gift wrap, can be handled with a product options app or metafields.
After you fix these products, check that the stock count for each variant is still right.
Step 4: Import Customer Data
Format your Wix customer export to match Shopify’s customer CSV template.
Key field mapping:
| Wix Field | Shopify Field |
|---|---|
| firstName | First Name |
| lastName | Last Name |
| phone | Phone |
| address.addressLine | Default Address Address1 |
| address.city | Default Address City |
| address.subdivision | Default Address Province Code |
| address.country | Default Address Country Code |
| address.postalCode | Default Address Zip |
To import: Shopify Admin → Customers → Import → Add file → Import customers
Reminder: Customer passwords cannot be transferred. After launch, send all customers a Shopify account activation email so they can set new passwords and access their order history.
Step 5: Handle Orders, Blog Posts, and Other Data
Order history
Wix’s order export format does not map directly to Shopify’s import format; orders cannot be imported via native CSV. Options:
- Use LitExtension or Cart2Cart to migrate orders automatically
- Use EZ Importer (a Shopify app) to import historical order data from a formatted CSV
- Many stores choose to import only the last 12 months of orders, or start fresh on Shopify while keeping Wix accessible as an order history reference for 30–60 days post-launch
Blog posts
Wix has no export for blog content. For each post:
- Open the post in Wix
- Copy it into a new blog post in Shopify (search for “Blog posts” in your Shopify admin)
- Keep the same headings and the same URL ending, so your redirects stay simple
- Upload the images again, because the originals sit on Wix’s servers
- Enter the SEO title and description by hand
- Update links inside the post that still point to old Wix URLs
If you have dozens of posts, plan a full day for this, or load them in bulk with Matrixify.
Static pages (About, Contact, FAQ, Policy pages)
About, Contact, FAQ and policy pages work the same way. Copy each one into a new page in Shopify.
Digital products
Create each digital product in Shopify, untick the physical product setting, then upload the file with a digital delivery app so customers receive it after they pay.
Reviews
Wix reviews can’t be exported straight into Shopify. Install a review app such as Judge.me or Yotpo and use its import tool.
Step 6: Rebuild Design, Navigation, and Apps
Customize your theme
Using the Shopify Theme Editor (Online Store → Themes → Customize):
- Upload your logo and brand assets
- Configure color palette and typography to match your brand
- Build your homepage sections (hero banner, featured collections, testimonials)
- Set up your navigation menus in Shopify. These are under Online Store → Navigation
Rebuild your collections
Wix product categories need to be recreated as Shopify collections. Shopify offers two types:
- Manual collections: you add products individually
- Automated collections: products are added automatically based on conditions (tag, price, product type)
For most migrating stores, automated collections based on product tags are the fastest setup.
Find Shopify equivalents for your Wix apps:
| Wix App / Feature | Shopify Equivalent |
|---|---|
| Wix Reviews | Judge.me, Yotpo, Stamped.io |
| Wix Subscriptions | Recharge, Bold Subscriptions |
| Wix Loyalty Program | Smile.io, LoyaltyLion |
| Wix Abandoned Cart | Native in Shopify (no app needed) |
| Wix Chat | Tidio, Gorgias |
| Wix Email Marketing | Klaviyo, Mailchimp for Shopify |
| Wix Product Options | Infinite Product Options |
| Wix Bookings | Sesami, BookThatApp |
| Wix Events | Evey Events, Events Calendar |
| Wix Wishlist | Wishlist King, Wishlist Hero |
Install and test every replacement before launch. Don’t leave this for later.
If your store uses Velo
Custom code written in Wix Velo doesn’t run on Shopify. List each custom feature and what it does for your customers. Many can be replaced by an existing Shopify app. The rest need a developer to rebuild them.
Set up payments, shipping and taxes
None of these move from Wix. Set each one up under Settings:
- Payments: Settings → Payments
- Shipping: Settings → Shipping and delivery
- Taxes: Settings → Taxes and duties
Set up tracking again
Your Wix tracking codes don’t carry over. Connect Google Analytics 4, your Meta Pixel and any ad platforms to Shopify now, so you can test them in Step 8.
Step 7: Set Up 301 Redirects (Critical for SEO)
This is the most SEO-critical step of the entire migration. Wix and Shopify use completely different URL structures; every URL on your site changes.
Wix vs Shopify URL structures
| Page Type | Wix URL Example | Shopify URL Example |
|---|---|---|
| Product | /product-page/product-name | /products/product-name |
| Category | /shop or /category-name | /collections/collection-name |
| Blog post | /blog/post-name | /blogs/news/post-name |
| About page | /about | /pages/about |
Wix URLs differ from site to site, so use the list of real URLs you saved before you started. Every product, category, blog post and page needs a 301 redirect from its old Wix URL to its new Shopify URL.
How to add redirects in Shopify
- In your Shopify admin, go to Content → Menus
- Click View URL redirects
- Click Create URL redirect
- Enter the old URL in “Redirect from” and the new URL in “Redirect to”
For a large site, build a spreadsheet with old URLs in one column and new URLs in the next, then use Import on the same screen to upload them all as a CSV.
Three rules for redirects
- Match each page to its real new page. Don’t send every old URL to your homepage. Google treats that as a missing page and the ranking is lost.
- No redirect chains. Each old URL should go straight to its final destination.
- Test them. Type old Wix URLs into your browser and confirm each one lands on the right Shopify page.
Step 8: Test Everything Before Going Live
Access your Shopify store through its temporary domain (yourstore.myshopify.com) while your domain still points to Wix. Test thoroughly:
Products and catalog
- Browse through product pages, verify descriptions, images, pricing, and variants
- Check that collections are correctly organized
- Confirm inventory levels are accurate
Checkout and payments
- Place a complete test order using Shopify’s payment test mode: Settings → Payments → Manage → Enable test mode
- Test with at least two different payment methods if you’re offering multiple
- Verify that shipping rates are calculated correctly for different zones
- Confirm tax calculations match your expected rates
- Test discount codes
Apps and integrations
- Confirm email marketing signups are syncing to your email platform
- Verify review apps are displaying correctly
- Test any loyalty program or subscription app functionality
- Check that chat apps are loading
SEO and technical
- Test all 301 redirects (a sample of products, categories, and blog posts)
- Go to Settings → Permalinks equivalent in Shopify, visit Settings → General, and confirm your URL structure is correct
- Run a speed test on key pages using Google PageSpeed Insights
- Test on mobile at a minimum iPhone and Android
Do not switch your domain until every test passes.
Step 9: Transfer Your Domain and Go Live
Option A: Connect your Wix domain to Shopify
If your domain is registered with a third-party registrar (not through Wix), connect it to Shopify:
- In Shopify: Settings → Domains → Connect existing domain
- Enter your domain name
- Log in to your domain registrar and update:
- A record to: 23.227.38.65
- CNAME record (www) to: shops.myshopify.com
- DNS propagation typically takes 2–24 hours
Option B:Transfer a Wix registered domain to Shopify
- In your Wix dashboard, open your domain settings and choose to transfer the domain away from Wix
- Wix sends you an authorization code
- In Shopify, go to Settings → Domains → Transfer domain
- Enter your domain and the code
Transfers usually take 5 to 7 days, and a domain can’t be transferred in the first 60 days after it was registered. You don’t need to transfer before launch. Many store owners point the domain first and transfer it later.
Protect your email. If your business email runs on this domain, leave the MX records exactly as they are when you edit your DNS. Changing them stops your email.
Tip. Lower your domain’s TTL to 300 to 600 seconds at least a day before the switch. The change then spreads faster.
Don’t cancel Wix yet. Keep your Wix account active for at least 30 days after going live. You’ll almost always find a missing redirect or a piece of content you overlooked, and it’s much easier to fix with Wix still open. If your domain stays registered with Wix, keep the domain itself active even after you close your site plan.
Step 10: Monitor Your Store After Launch
On launch day
- Submit your new sitemap (yourdomain.com/sitemap.xml) to Google Search Console
- Check that Google Analytics and your ad pixels record a real order
- Send account activation emails to existing customers
- Tell your customers about the new store by email
In the first week
- Check Google Search Console every day for crawl errors and 404 pages, and add any missing redirects
- Watch your orders, checkout and payments closely
- Click through your old Wix links in Google results and confirm they land on the right pages
In the first month
- Compare your rankings and organic traffic with the numbers you recorded before the move
- Review your site speed on key pages
- Once everything is stable, cancel your Wix site plan
Will You Lose Google Rankings When You Move from Wix to Shopify?
Changing platform doesn’t hurt your rankings by itself. What hurts, and what you can prevent, is URLs changing without redirects, SEO titles and descriptions getting lost, or the new site loading slower. Our guide to migrating a website without harming SEO covers the wider best practices.
What to expect
- Some ranking movement in the first few weeks is normal while Google crawls your new URLs
- When every URL is redirected and your SEO details are kept, rankings usually settle again
- Stores that skip redirects can take months to recover, and links that point to dead pages stop passing value
A real example. When we moved TechShift to a new site and domain, we mapped every old URL with 301 redirects and kept 100% of its SEO value. Keyword rankings grew 35% after launch. You can read the TechShift case study for the details.
What to Do If Your Traffic Drops After Migration
- Look for 404 pages. Open the Pages report in Google Search Console and add a redirect for every old URL that returns an error.
- Check where your redirects go. Each one should land on the matching page, not the homepage, and not pass through a second redirect.
- Make sure Google can see your store. Remove the storefront password and check that your pages aren’t set to noindex.
- Compare your top pages. Check that titles, descriptions and headings on your best pages match the old Wix versions.
- Fix internal links. Update links in your content that still point to old Wix URLs, and confirm your new sitemap is submitted.
- Check your speed. Remove apps you don’t use and compress large images.
Common Wix to Shopify Migration Mistakes to Avoid
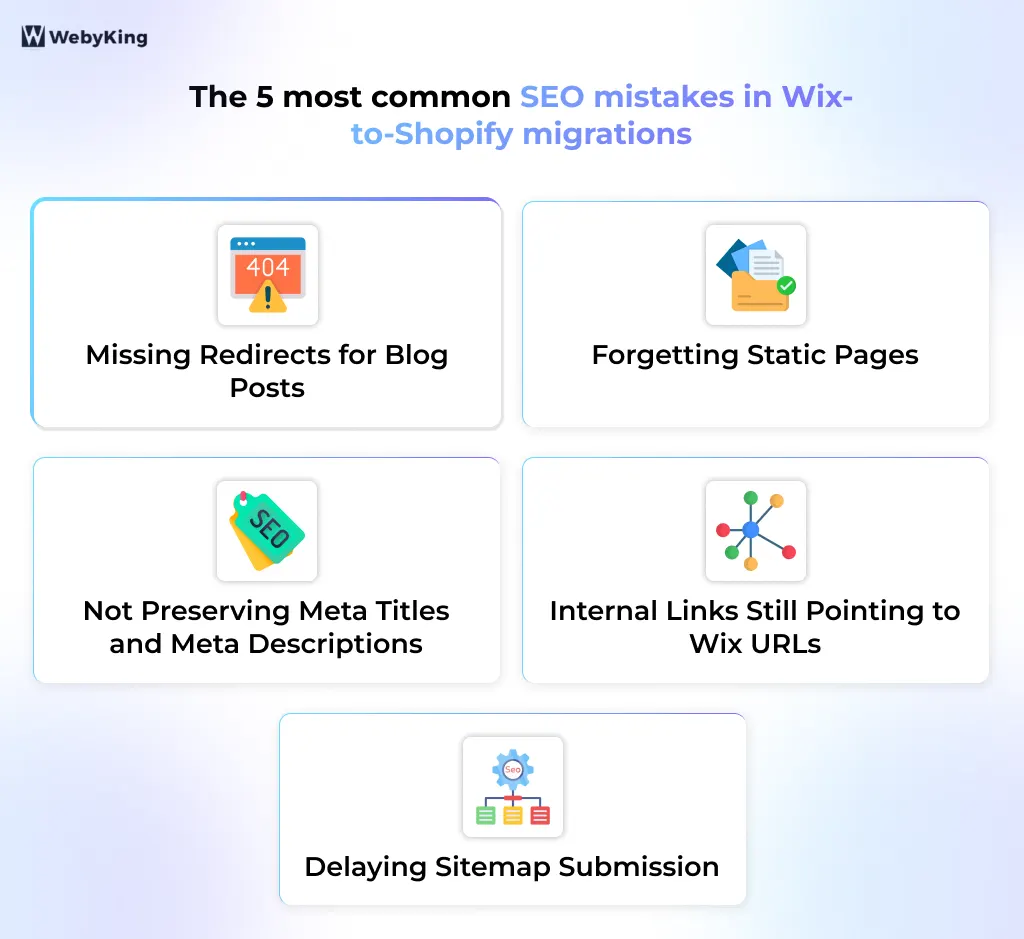
- Missing redirects for blog posts: Blog URL structure changes completely from Wix to Shopify. Every post URL needs a redirect, not just product pages.
- Forgetting static pages: About, Contact, FAQ, and policy pages all have new URLs in Shopify. All need redirects.
- Not preserving meta titles and meta descriptions: If you’re migrating blog content manually, re-enter SEO metadata for every post. Don’t leave it blank for Shopify to auto-generate.
- Internal links still pointing to Wix URLs: After rebuilding blog posts and pages in Shopify, update any internal links within content to point to the correct new Shopify URLs.
- Delaying sitemap submission: Submit your new sitemap to Google Search Console on the day you go live, not days later.
How Much Does It Cost to Migrate from Wix to Shopify?
There are three costs to plan for: your Shopify plan, the migration itself and the apps you’ll run afterwards.
Shopify plan
| Plan | Monthly price | Price per month, billed yearly | Fee if you don’t use Shopify Payments |
|---|---|---|---|
| Basic | $39 | $29 | 2% |
| Grow | $105 | $79 | 1% |
| Advanced | $399 | $299 | 0.6% |
Prices as listed on Shopify’s pricing page in October 2026.
The migration
| Method | Cost |
|---|---|
| Shopify Store Migration App | Free |
| Manual CSV | Free, plus your time |
| Migration apps | Paid, based on how many products, customers and orders you move. LitExtension and Cart2Cart both have price estimators on their sites |
| Professional migration service | Quoted for your store. It depends on catalog size, design work, apps and how much SEO traffic needs protecting |
After the move
- Apps. Many are free. Paid apps for email, reviews, loyalty or subscriptions are billed monthly.
- Theme. Free, or a one time purchase for a paid theme.
- Wix overlap. Budget for about a month of running both platforms.
For a fuller breakdown, read our guide to website migration costs or try the migration cost calculator.
How Long Does a Wix to Shopify Migration Take?
| Store size | Typical time |
|---|---|
| Small (under 100 products, simple setup) | A few days |
| Medium (100 to 500 products, some apps) | 1 to 2 weeks |
| Large (500+ products, a blog, custom features) | 4 to 12 weeks with a professional team |
The slowest parts are usually copying blog posts and pages by hand, rebuilding your design, cleaning up the product CSV and replacing custom features. Plan extra time for those.
Post-Migration Checklist
Don’t declare the migration complete until every item is verified.
Data verification
- Product count matches Wix — verify no products were dropped
- Sample of 20+ products checked for description accuracy, variant correctness, and image loading
- Customer records imported with correct field mapping
- Order history imported (if applicable) with correct statuses
- Collections and navigation structure correct
Technical verification:
- All 301 redirects implemented and tested for products, categories, blog posts, and pages
- No noindex tags on live site pages
- SSL certificate active (padlock visible in browser address bar)
- XML sitemap submitted to Google Search Console
- Google Analytics 4 tracking verified
- All advertising pixels verified individually (Meta Pixel, Google Ads, TikTok Pixel, etc.)
- Canonical tags pointing to correct URLs
Functionality testing:
- Test order placed through full checkout with payment processing
- Shipping rates are calculated correctly for all zones
- Tax calculations matching expected rates
- Discount codes working
- Contact forms submitting and reaching the correct destination
- All app integrations confirmed functional
- Email marketing signup forms syncing to the email platform
- Mobile checkout tested on real devices
Customer communication:
- Account activation emails sent to existing customers
- Announcement sent to the customer list about the new store
30-day post-launch monitoring:
- Monitor organic traffic daily in GA4 for the first 2 weeks
- Check Google Search Console for crawl errors within 48 hours
- Monitor for 404 errors and fix any missing redirects immediately
- Compare keyword rankings against pre-migration benchmarks at 30 days
Final Thoughts
This Wix to Shopify migration guide shows that moving platforms is more than just transferring content; it’s a structured migration process that affects your products, URLs, SEO, and store functionality. When handled properly, you can complete the migration without downtime or long-term ranking loss. The key is backing up your data, choosing the right migration method, rebuilding your storefront carefully, and implementing complete 301 redirects before going live.
For small stores, manual migration or Shopify’s built-in tools are usually enough. Larger stores with SEO traffic, complex catalogs, or custom functionality often benefit from professional website migration services to reduce risk and save time. If you’re looking for a structured and SEO-safe transition, working with an experienced team like WebyKing can help ensure your Wix to Shopify migration is completed smoothly without data loss or ranking disruption.
Frequently Asked Questions
Does my Wix store go down during migration?
No. Your Wix store stays completely live while you build and test your Shopify store in the background. You only switch your domain to Shopify when everything is verified and ready. Your customers experience zero disruption during the migration process.
Does my Wix theme transfer to Shopify?
No. Wix and Shopify use entirely different theme architectures. You’ll choose a Shopify theme and rebuild your storefront’s visual identity. This is an opportunity to modernize your design, not just a limitation.
Will I lose my Google rankings when I migrate from Wix to Shopify?
Short-term fluctuation of 2–4 weeks is expected as Google recrawls the new site. Permanent ranking loss is preventable; it requires complete 301 redirect coverage and preserved metadata. Stores that implement redirects correctly typically stabilize at pre-migration traffic levels within 4–8 weeks.
What happens to my customer accounts and passwords?
Customer records (names, emails, addresses) migrate successfully. Passwords cannot transfer; this is a security restriction. Send existing customers a Shopify account activation email after launch so they can set new passwords and access their purchase history.
Can I keep my domain when switching from Wix to Shopify?
Yes. Your domain stays the same. If it’s registered with a third-party registrar, you point it to Shopify by updating DNS settings. If it’s registered through Wix, you can transfer it to Shopify or another registrar.
Do I need a developer to migrate from Wix to Shopify?
For small stores: no. Shopify’s Store Migration App, CSV import, and Theme Editor are designed for non-developers. For medium to large stores with blog content, custom functionality, and SEO-sensitive organic traffic, a developer or migration specialist significantly reduces the risk of errors and time investment.
What happens to my blog posts during migration?
Wix has no blog post export feature. Every blog post must be manually copied into Shopify’s blog editor. If you have significant blog content, plan a specific time for this; it’s often the most time-intensive part of a Wix migration and is frequently underestimated.
Can I migrate digital products from Wix to Shopify?
Wix does not support exporting digital products. You’ll need to re-upload each digital product file manually in Shopify after migration. Make sure to download all digital product files from Wix during your backup step before the migration begins.
How do I migrate order history from Wix to Shopify?
Wix order exports don’t map directly to Shopify’s import format. Use a migration app (LitExtension, Cart2Cart) or EZ Importer (a Shopify app) for historical orders. Many stores import only 12 months of history to keep their Shopify dashboard clean.
Is Shopify worth it after migrating from Wix?
For stores hitting Wix’s limited variant caps, payment availability restrictions, app ecosystem gaps, or multichannel selling needs, the switch to Shopify typically results in better performance, more flexibility, and reduced operational friction. For very small stores with simple needs, the added cost and learning curve may not be worthwhile yet.
I'm Ravi Makhija, Founder & CEO of WebyKing. I believe your website should be the hardest-working member of your team, building trust, generating leads, and creating opportunities 24/7. Through web design, development, SEO, and digital strategy, I help businesses build websites that become growth assets-not just digital brochures. Too many businesses invest in websites that look great but fail to deliver real business value.
Business owners deserve digital solutions that are simple, practical, and built around their goals, not unnecessary complexity. After all, your website shouldn't just represent your business; it should help grow it.



Need Help Migrating from Wix to Shopify Without Issues?