Updated on: February 5, 2026
Reading Time: 12 minutes
Post Views: 507
If you’re running a Shopify store, payments are one of the first things you need to get right – because no sale is complete until the money reaches you. That’s where Stripe steps in. Known for its smooth checkout process, advanced fraud protection, and support for global currencies, Stripe is one of the top payment gateway businesses rely on.
The best part?
Connecting Stripe with your Shopify store is quick, straightforward, and designed to give your customers a frictionless buying experience.
Let’s dive into how you can enable Stripe within Shopify and start powering your checkout with a payment system trusted by millions of online businesses worldwide.
Highlights
- What is Stripe?
- What Are The Benefits Of Integrating Stripe With Shopify?
- How to Create a Stripe Account?
- Having Trouble Creating a Stripe Account in Your Country?
- What Should You Check Before Adding Stripe to Shopify?
- How to Add Stripe to Shopify (Step-by-Step)
- Stripe Not Working Properly with Shopify?
- Common Shopify Stripe Integration Problems and Fixes
- Final Touches Before Setting Stripe Live on Shopify
- Shopify Stripe Pricing: Fees and Subscriptions
- Shopify Payments vs Stripe – Which Solution is Best for You?
- When Should You Hire an Expert for Shopify Stripe Setup?
- FAQs on Shopify Stripe Integration
What is Stripe?
Stripe is a powerful payment gateway that allows businesses to accept online payments securely and seamlessly, supporting everything from credit and debit cards to digital wallets like Apple Pay and Google Pay.
While Shopify has its built-in option called Shopify Payments, it isn’t available in every country—meaning merchants in certain regions don’t have access to it. In those cases, Stripe often becomes the go‑to solution, giving store owners the flexibility to process payments globally, manage transactions in multiple currencies, and ensure their checkout experience is smooth regardless of where their customers are shopping from.
What Are The Benefits Of Integrating Stripe With Shopify?
Integrating Stripe with Shopify gives merchants more flexibility and control over their payment processing setup, especially if Shopify Payments isn’t available in their country. Beyond simply processing transactions, Stripe provides a robust ecosystem that can scale with your business. If you’re wondering how to get Stripe on Shopify, the process is simple and opens up a range of benefits you can take advantage of.
Some of the key benefits include:
- Global Availability: Stripe operates in more countries than Shopify Payments, making it ideal for international sellers.
- Direct Stripe Dashboard Access: Monitor payments in real time, issue refunds instantly, and handle disputes with more detailed reporting tools.
- Support for Multiple Payment Methods: Accept credit/debit cards, digital wallets (Apple Pay, Google Pay), BNPL options, local bank transfers, and regional wallets to boost conversions across markets.
- Advanced API & Automation: Stripe’s developer-friendly API enables you to customize payment flows, automate billing, and integrate with external tools such as CRM and accounting systems.
- Consistency Across Channels: If you’re already using Stripe on other platforms, linking it to Shopify helps keep all payments under a single provider for smoother operations.
While Shopify does apply extra processing fees when you use third-party gateways like Stripe, many merchants find the trade-off worthwhile for its global reach, extended payment options, and deeper data insights.
Before you can enjoy these benefits, you need to set up a Stripe account—here’s how to do it step by step.
How to Create a Stripe Account?
Step 1: Visit Stripe’s Website
- Go to Stripe’s official website
- . Click on “Start now” or “Sign up”.
Step 2: Provide Your Email and Create a Password
- Enter your email address.
- Create a strong password.
- Enter your full name.
- Click “Create account”.
Step 3: Verify Your Email
- Stripe will send a verification email to the address you provided.
- Open the email and click on the verification link.
Step 4: Activate Your Stripe Account
To start receiving payments, you need to activate your account by providing some business and personal details:
- Business Information
- Legal business name
- Business address
- Business phone number
- Website URL (if you have one)
- Business Type
- Individual/Sole Proprietor
- Company (LLC, Corporation, etc.)
- Personal Information
- Name, date of birth, and home address
- Social security number (SSN) or equivalent for identity verification
- Bank Account Details
- Bank account number and routing number for payouts
Bank account must be under your business or personal name depending on your business type
Step 5: Set Up Payments
- After account activation, you can connect Stripe to your online store, app, or payment system.
- Choose the integration method: Stripe Checkout, Stripe API, or a plugin (like Shopify, WooCommerce, Wix, etc.).
Step 6: Test Your Stripe Account
- Use Stripe’s test mode to simulate payments before going live.
- This ensures your integration works smoothly without risking real money.
Step 7: Go Live
- Once testing is complete, switch to live mode.
- Customers can now pay using credit/debit cards, digital wallets, and more.
💡 Tip: Keep your Stripe dashboard secure, and ensure your business info matches your bank account details to avoid payout delays.
Having Trouble Creating a Stripe Account in Your Country?
Stripe rules vary by country. Tell us where you’re stuck, and our Stripe specialists will guide you with the safest setup for your region.
What Should You Check Before Adding Stripe to Shopify?
Before you dive into Shopify’s payment settings, it’s worth pausing for a quick pre-check. Think of this step as laying the foundation so you don’t hit a roadblock later. A few minutes here can save you a lot of frustration during setup.
1. Check Availability First
Stripe doesn’t appear for every Shopify store. Why? Because Shopify Payments (Shopify’s built-in payment solution powered by Stripe) takes priority in certain countries. If Shopify Payments is available where you operate, you may not see Stripe as a separate option. So, your first step is to confirm whether Stripe is supported in your region—or whether you’ll need to use Shopify Payments instead.
2. Make Sure Your Bank Account is Ready
Stripe will pay out directly to your bank account, so make sure you’re using one that accepts payouts in your local currency. Using the wrong account type can delay or block your payouts, which is the last thing you want once your sales start rolling in.
3. Gather Your Business Details
Stripe, like any financial service, needs to verify your business. Keep your legal business name, physical address, and tax information handy. Having these details ready means you won’t be scrambling to find documents mid-setup.
4. Double-Check Your Currency Settings
This one’s easy to overlook: ensure the currency you’ve set for your Shopify store matches one supported by Stripe in your country. If they don’t match, your payouts could fail, even if the setup looks successful on the surface.
Troubleshooting Tip: If you don’t see Stripe as a payment option, don’t panic. Here are a few common reasons why it might be missing:
- Shopify Payments is already available in your country (and replaces Stripe).
- Your store’s currency doesn’t line up with Stripe’s supported currencies.
- You’re on a free trial or using an account without admin privileges.
If you’re stuck, the quickest fix is to check Stripe’s global availability page or reach out to Shopify Support for clarification.
How to Add Stripe to Shopify (Step-by-Step)
Online sellers can quickly set up Stripe with Shopify to start accepting payments. While the process is simple, the exact configuration may differ based on your store’s location, chosen payment methods, and applicable fees.
Friendly Reminder: Before connecting Stripe to Shopify, ensure you already have active accounts on both platforms.
Below are the steps to integrate Stripe with Shopify:
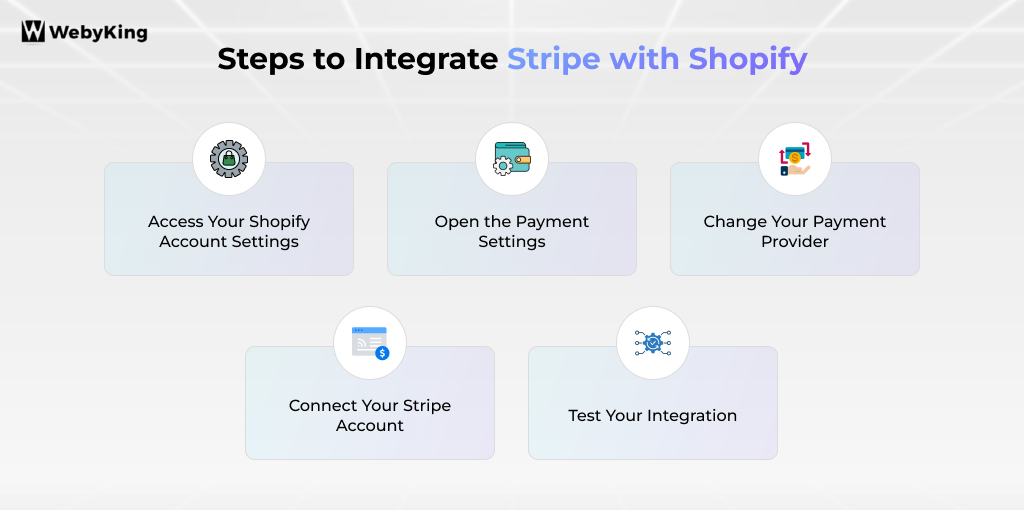
Step 1: Access Your Shopify Account Settings
To begin, make sure you already have active Shopify and Stripe accounts. If not, create them first (think of this as step 0 ). Next, log in to your Shopify dashboard. Keep in mind:

- Stripe must be available in your country for integration to work.
- You’ll need admin privileges and an active paid Shopify plan – it won’t work on free trials.
Step 2: Open the Payment Settings
To connect Stripe to Shopify from your Shopify dashboard, go to Settings > Payments.
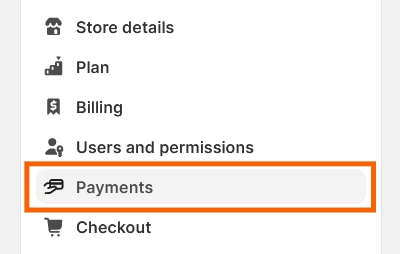
All the payment gateways in Shopify are managed in the payments section. From the menu:
Go to Settings > Payments in your admin panel.
If a greyed layout, possible reasons are:
- You don’t have admin access.
- You’re still on a free trial.
- Your store plan isn’t active.
If that happens, contact the store owner or Shopify support to unlock access.
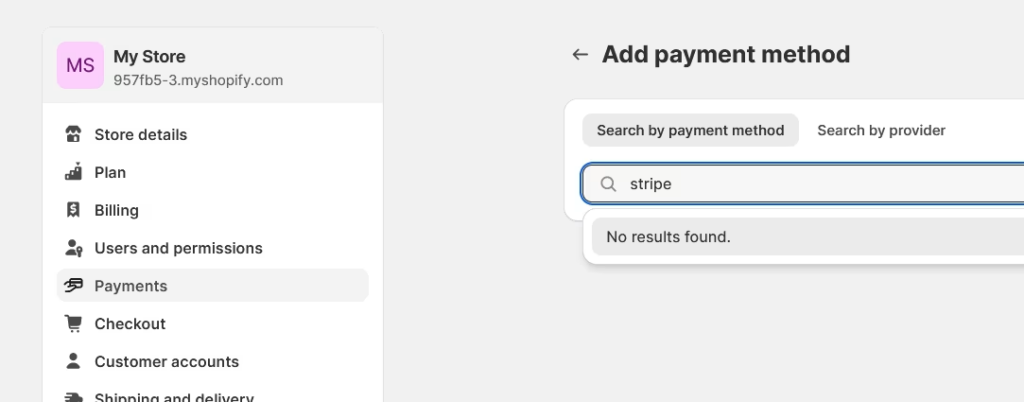
Step 3: Change Your Payment Provider
Now, it’s time to connect Stripe:
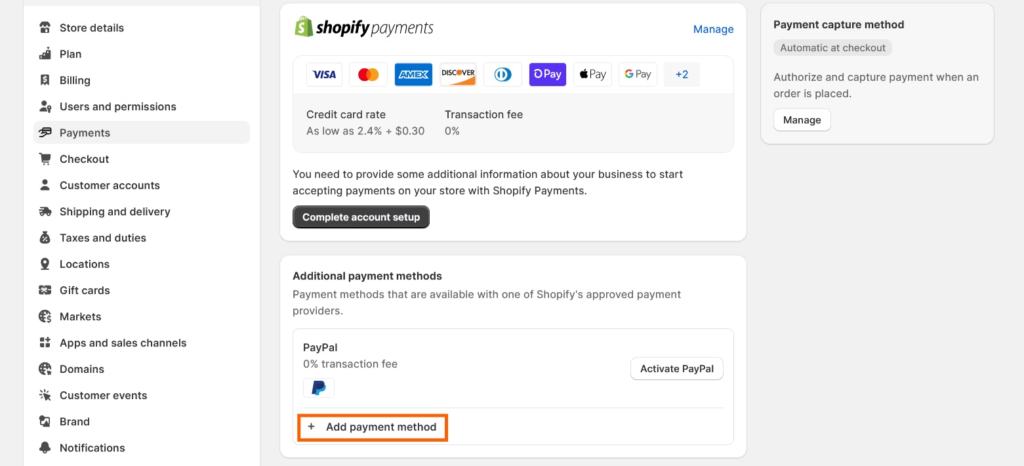
- In the Payment module, scroll to Additional Payment methods
- Click Add Payment method.
- Use the search box and type “Stripe”.
- If Stripe is available in your region, it will appear for selection.
Note: In countries where Shopify Payments operates, Stripe may be hidden or shown as unavailable since Shopify refers to its in-house system.
Step 4: Connect Your Stripe Account
Clicking Stripe will prompt you to sign in. Enter your Stripe login details, authorize the connection, and hit Activate. Once completed, your Shopify store will be linked directly to Stripe, allowing you to accept payments without redirecting your customers to another page.
Step 5: Test Your Integration
Never skip testing – this ensures the payment process runs smoothly before going live. You have two ways:
Real transaction: Place a test order with your card and cancel it (note: processing fees may apply).
Test Mode: In Manage > Manage payment methods, enable Stripe Test Mode and use test card numbers, such as:
- Card: 1212 3434 5656 7878
- Expiry: Any future date (e.g., 10/29)
- CVV: Any 3-digit code (e.g.456)
- Name: Any test name
After testing, remember to turn off Test Mode to start accepting real payments.
With that, your Shopify store is now officially connected to Stripe. Customers enjoy a seamless checkout while you gain Stripe’s flexibility and reporting power to manage payments effectively.
Stripe Not Working Properly with Shopify?
If Stripe isn’t showing, payments are failing, or payouts are stuck, tell us what’s happening and our Shopify payment expert will review your setup.
Common Shopify Stripe Integration Problems and Fixes
Even though connecting Stripe with Shopify is usually straightforward, merchants do run into roadblocks from time to time.
Most of these issues are related to account setup, regional restrictions, or payment processing settings.
Problem 1: Unavailability of Stripe
Challenge: You’re all set to add Stripe, but the option doesn’t even appear.
Fix: If you can’t find Stripe on Shopify, it’s usually because you’re in a country where Shopify Payments is available or where Stripe isn’t supported. Double-check availability by entering your region in Stripe’s supported countries list or contacting Shopify Support.
Problem 2: Payments are not going through or frequently failing
Challenge: Customers try to pay, but the checkout keeps declining or stalling.
Fix: Ensure your Stripe account is fully verified with all required business details and documents. Also, confirm that your Shopify checkout settings support the payment methods you’ve enabled in Stripe.
Problem 3: "Payments" tab in Shopify settings is grayed out
Challenge: You’re ready to connect Stripe but can’t even click the option in settings.
Fix: This occurs if you don’t have administrative rights, or still on a free trial, or don’t have a paid plan. Upgrade the account or ask the admin to grant you access.
Problem 4: Stripe is connected, but not showing transactions in the dashboard
Challenge: Orders are coming in, but your Stripe dashboard looks empty.
Fix: Check if you’re in Test Mode. If enabled, real payments won’t be captured. Disable Test Mode in Shopify > Payments > Manage, and transactions will start showing in your Stripe dashboard.
With these quick fixes, most integration issues can be resolved without heavy technical support, ensuring your store keeps running smoothly.
For a complete guide on maintaining your Shopify store, take a look at our Shopify Store Maintenance Checklist.
Struggling with Stripe Integration? Let Experts Handle It
Get your Shopify payment setup right the first time. Our eCommerce specialists can integrate Stripe, test it, and customize it to fit your store—so you don’t lose sales to failed checkouts.
Final Touches Before Setting Stripe Live on Shopify
Last but not least, make sure to follow these tips before going live with Stripe.
- Always Test First: Enable Stripe’s Test Mode before going live to make sure everything works perfectly without risking real transactions.
- Match Currency & Country Settings: Ensure your Shopify store and Stripe account use the same currency and country settings to avoid payment errors.
- Keep API Keys Secure: Never share your Stripe API keys. Treat them like passwords to protect your store and customers.
Use Fraud Prevention Tools: Combine Shopify’s built-in fraud prevention features with Stripe’s security measures for safer transactions.
Shopify Stripe Pricing: Fees and Subscriptions
When integrating Stripe with Shopify, understanding the associated pricing is essential to effectively manage your costs.
Stripe payment gateway operates on a transparent, pay-as-you-go model with no monthly fees, setup charges, or hidden costs. You pay primarily per transaction, and fees vary slightly depending on the payment type, region, and additional services like subscription billing.
| Fee Type | Cost | Notes |
|---|---|---|
| Standard Online Transactions | 2.9% + $0.30 per successful charge | Most credit/debit card payments and digital wallets |
| In-person Payments (Stripe Terminal) | 2.7% + $0.05 per transaction | For physical card-present payments |
| International Card Fee | +1% on top of the standard rate | Applies to cross-border transactions |
| Currency Conversion Fee | +1% | Applied when currency conversion is required |
| ACH Direct Debit Payments | 0.8% (max $5 per transaction) | For bank transfer payments, cost-effective for large amounts |
| Wire Transfers | $8 per transaction | Higher cost, usually used for large transfers |
| Stripe Billing (Subscriptions) | 2.9% + $0.30 per transaction | Pay-as-you-go for subscription payments |
| Stripe Billing Usage Fee | 0.5% to 0.8% on recurring payments | Depending on the plan selected (Starter or Scale) |
| Monthly Fees | None (except optional add-ons) | No setup fees or mandatory monthly charges |
Stripe enables Shopify store owners to pay only for what they use, allowing flexibility, especially for growing businesses. Keep in mind that Shopify charges additional fees when using third-party payment processors like Stripe—typically around 2% on basic plans—so factor this into your overall cost calculations.
Shopify Payments vs Stripe – Which Solution is Best for You?
Choosing between Shopify Payments and Stripe depends on your business needs, location, and the payment options you want to offer. Shopify Payments is Shopify’s native payment gateway, powered by Stripe technology for seamless integration and ease of use.
Stripe, on the other hand, supports a broader range of countries and advanced features, making it a flexible alternative for merchants needing more customization or operating outside Shopify’s Payment’s coverage.
| Feature | Shopify Payments | Stripe |
|---|---|---|
| Country / Region Support | Limited to 20 countries | Available in 48+ countries worldwide |
| Languages Supported | Main Shopify admin languages | Supports multiple languages via API and dashboard |
| Checkout Experience | Embedded and fully integrated | Integrated but may require setup |
| Payment Methods Accepted | Cards, Apple Pay, Google Pay, local wallets (varies by country) | Cards, Apple Pay, Google Pay, bank transfers, Buy Now Pay Later, and local payment options worldwide |
| Transaction Fees | Varies by Shopify plan; no extra fee if using Shopify Payments | Typically 2.9% + $0.30 per transaction, plus extra Shopify third-party fees |
| Setup Complexity | Turnkey, minimal setup | Requires manual integration and configuration |
| Currency Support | Multi-currency is supported in the supported countries | Supports 135+ currencies with real-time conversion |
| Developer Customization | Limited customization | Highly customizable via rich APIs |
When Should You Hire an Expert for Shopify Stripe Setup?
Integrating Stripe with Shopify is more than just a setup step—it’s the gateway to offering your customers a secure, reliable, and effortless checkout experience. When done right, it not only streamlines payments but also builds trust, paving the way for steady growth in your online business.
By merging the robust payment capabilities of Stripe with the user-friendly interface of Shopify, you are positioning your store for enduring success. If you seek an additional advantage, collaborating with a team like WebyKing can elevate your experience even further. We excel in Shopify Web Design, Shopify Development, and Shopify SEO . We create customized eCommerce strategies that refine your brand, streamline operations, and boost sales.
Ready to take your Shopify store to the next level? Get in touch with us
and let’s make it happen together.
Still Unsure Which Payment Gateway Fits Your Store?
Choosing between Shopify Payments and Stripe can be tricky. Our experts will review your store setup, location, and sales goals to recommend the best option—so you maximize profits without payment headaches.
FAQs on Shopify Stripe Integration
Is Stripe supported on Shopify?
Yes, Stripe can be integrated with Shopify as a third-party payment gateway in regions where Shopify Payments is not available.
How do I connect Stripe to my Shopify store?
You connect Stripe by adding it as a payment provider in Shopify’s Payments settings and then signing in to your Stripe account to activate the integration.
Does using Stripe on Shopify cost extra?
Yes, Stripe charges transaction fees (typically 2.9% + 0.30 per charge), plus Shopify applies additional fees for third-party payment gateways.
Can I use both Stripe and Shopify Payments simultaneously?
No, Shopify disables third-party gateways like Stripe in countries where Shopify Payments is active. You must choose one.
Are there any restrictions when using Stripe with Shopify?
Restrictions mainly involve country availability, Shopify’s fee structure, and limited support if you want advanced customization outside Shopify’s platform.
Is Stripe safe to use on Shopify?
Yes, Stripe is PCI DSS Level 1 compliant, offers fraud detection, and encrypts transactions for secure payments.
Does Stripe work with Shopify POS (Point of Sale)?
No, Shopify POS only works with Shopify Payments, not Stripe directly.
Tip: If Shopify Payments isn’t available in your country, Shopify POS cannot process in-person payments. Use a third-party POS system or an external card reader compatible with your region to handle offline sales.
How can I get paid on Shopify as a non-US citizen, since Stripe does not work in countries like Costa Rica, etc.?
If Stripe isn’t supported in your country, you can use third-party gateways like 2Checkout, PayPal, or Payoneer. Another option is registering a business in a Stripe-supported country through services like Stripe Atlas.
Can you explain how Stripe works with merchants on Shopify Plus and other platforms?
Shopify Plus merchants get access to deeper Stripe features like multi-currency routing, advanced fraud tools, and customizable checkouts. Regular Shopify users simply use Shopify Payments, which is powered by Stripe behind the scenes.
Can you use a personal Stripe account to receive payments on Shopify?
No — Shopify requires a fully verified business Stripe account that matches your business details. Using a personal or mismatched Stripe account may trigger payout holds or account suspension.
Ravi Makhija, the visionary Founder and CEO of WebyKing, is a seasoned digital marketing strategist and web technology expert with over a decade of experience. Under his leadership, WebyKing has evolved into a premier full service web and marketing agency, delivering innovative solutions that drive online success. Ravi’s deep understanding of the digital landscape combined with his passion for cutting-edge technologies empowers him to consistently exceed client expectations and deliver results that matter.


")